
After my goals post last month, I had a few readers ask about my process for my photo routine, so today’s post is all about how I get the thousands of pictures on my iPhone sorted, stored, and backed up in a way that is most useful for me. I’m hoping this will be helpful for readers in various phases of life, but you may want to organize them differently based on your needs and goals. This is a bit of a lengthy post so maybe grab your favorite drink and a snack before you dive in…
So, let’s start with this disclaimer: I am FAR from perfect at this process. I keep probably 3-5 times the number of pictures than someone less sentimental than me might. I’m a bit of an emotional packrat. THINGS I have very little parting with, but MEMORIES I hoard like a little documenting dragon. Journals, photos, scrapbooks… and this is a habit that has gotten more difficult with kids. BUT I recognize the fact that if I kept EVERYTHING then more memories would get lost in just the massive scale of stuff to sort through- even if all that stuff is digital.
Here are the three goals that guide my photo routine:
*Create a yearly family scrapbook and get it physically printed each year so friends and family can look back on our year.
*Feel confident that the memories I want to keep are safe. For me to have peace of mind about this, it means backing up my photos in at least two places so I don’t worry about losing memories if a computer crashes. To be totally honest, I’d like to get a third back up system (either digitally or a portable hard drive that I can send to someone else’s house if something horrible were ever to happen to our house.)
*Have my photos organized in a way that I could find pictures of a specific event in a manageable way.
Again, your goals might be different than mine, which might change what you want to be part of your routine. That being said, here’s a bit about my routine (ideally… it doesn’t always happen this way… such as the last few months when I totally let my backup and storage routines go and had to play catch up!)
DAILY:
Part of the evening routine I am trying to put in place is to edit through my iPhone photos at the end of each day. This isn’t the detailed editing work you’ll read about in my weekly routine, this is super basic deleting photos that I know I won’t use- super blurry pictures of things I got clear images of later (I keep a lot of blurry pictures thanks to my active kids, but I try to keep the least blurry most of the time), same with pictures where my kids are looking away if I have a picture I KNOW we’ll all prefer more. This is also when I delete pictures that have served their purpose already- either because I just wanted to send them to friends in that moment, a screenshot of something I needed to reference and no longer need, etc. and of course the accidental bursts of the inside of my purse or the intentional bursts of photos from when my toddler grabbed my phone. I might also favorite a few photos if I have enough time to get more detailed. This makes the weekly process a lot easier!
WEEKLY:
If I’m really on top of things, then my weekly routine includes making my weekly scrapbook page. I use the Project Life App for this (It is free! And super budget friendly if you can keep yourself from buying ALLLL the cute app kits.) I’m not going to go into detail about how the project life app works because if you are interested in it, the creator of the app created a whole youtube playlist about it and you can check it out HERE. What I will say is that this works so well for me because it is so simple and does not take much time OR space. I create two pages a week to summarize what our week was like. I try to include special events or school projects, or milestones the kids hit (or that I hit! I definitely include screenshots of when I PRed mileage during marathon training) as well as snapshots of the mundane or things that really illustrate what life was like right now. Sometimes that means pictures of gas prices, sometimes that means journaling what everyone’s favorite TV show is or how much a gallon of milk usually costs. Sometimes it is hard for me to pick only a few pictures to summarize the week, but this part goes a lot faster if I’ve done the daily work of picking favorite moments or deleting a few pictures. After I complete the page, I export it to my email and

This is what happens when I don’t do my daily purge- I get sooooo many duplicate pictures to sort- many thanks to bursts or my HD or live setting taking duplicate pictures of everything. Note the pictures of a blurry finger at the bottom of the image- these should have been an easy purge at the end of the day. Luckily still an easy purge but it can feel overwhelming when you see a big number of photos to sort through at the end of the month.
store them in an email folder all together until I am ready to have them printed, just because I want an extra back up! This takes me about 10-15 minutes each week.
I also try to do a weekly upload of my phone to our family desktop. I dump all the photos into a folder labeled IPHONE or IPHONE TO SORT and I just leave it there if I don’t have much time that week. If I do have extra time, I get started on my monthly photo sort
MONTHLY:
My monthly photo sort is the thing that most easily gets away from me in times of stress, but it is also the thing that makes me feel most at peace when I keep on top of it. I go through my photos and try to delete duplicates or pictures that are extremely similar, then I sort them. I sort in a bit of a weird way- I have separate folders for milestones for my kids that I keep under folder with their names, but 80% of our pictures- including pictures of the kids- end up being organized by calendar year. I’m going to detail this below under “playing catch up”
I also try to calendar in a task of a monthly catch up day for the daily or weekly stuff that just got away from me that month. But once again, some months this does not happen. Progress not perfection!!
QUARTERLY and SEMI-ANNUAL:
I back up the organized photos on my desktop quarterly to my external hard drive. I put these notes on my calendar at the beginning of each year and schedule when it’s convenient. This is when I feel comfortable deleting most of the photos from that time from my iPhone except my very favorites (I don’t have a super high memory capacity so this is very necessary to keep me from stressing about running out of phone memory or iCloud memory.)
I also do a semi-annual printing time because I think it is really important that I get pictures off my phone and into physical form. Usually I spend a few weeks before searching for discounts on printing. I don’t always print through the same place- but I do always focus on quality prints. Recently that has meant printing through the Project Life App if they are having a rare sale or else printing through Persnickety Prints through buying discounted bulk packages throughout the year and printing when appropriate. Printing semi-annually keeps it from seeming overwhelming but also saves me on shipping costs if I were to print more often.
PLAYING CATCH UP:
OK, so let’s get into more details about my monthly photo sort. For the most part, I wait until photos are uploaded onto my desktop before I decide which iteration of a similar picture to keep. This is simply because the bigger screen allows me to compare two images at once and to look at them on a larger scale than my iPhone would allow. As I mentioned above, I start by dumping everything into an unsorted folder called “IPHONE”. If you are approaching the task of sorting years of pictures, and don’t have a storage system in place yet, I highly recommend creating a folder as a starting point- you can call it “to sort” and depending on what your timeline is for the photos you need to sort, you may want to break it into years or seasons don’t get too specific here because that’s what you will do as you sort. I like going chronologically because it gives me a sense of how much progress I’ve made. It also fits into my system for organizing my photos.
 Then, similar to my daily purge of photos, I start with the easy targets. Duplicates that are easier to see are similar on my computer screen, and blank files that my iPhone annoyingly uploads each time of the original photos I have cropped or edited on my phone. They are useful on to keep on my phone because they let me revert to the original image and then re-crop or edit, but they are useless once I upload them to my desktop. This is an easy win for my brain because I can delete them all at once and decrease the number of files I have in my file to sort. All of these files end with .AAE so I do a search in the photo and it groups them all together instead of them trailing random cropped pictures. Then I can delete them all at once. Bye Bye useless files. After that comes the slower task of sorting.
Before you start sorting, I would open up a folder and create several sub-folders for WHERE you are going to store these photos. This is my strategy for beginning with the end in mind- I create these folders in a way that will make sense when I am going back years from now to search for photos. I start on the most basic level with organizing our family photos by year. So 2015, 2016, 2017, etc. are all folders you will see on my portable hard drive. Then I have sub-folders under each year. I re-use these titles each year which has made sorting faster. Most of these folders also have sub-folders- for example, I have the general folder of “Holidays and Celebrations” and under that I have folders for each family member’s birthday, for Valentines and Galentines (that seems like an obvious combo), etc. I also combine Christmas and Advent as one folder because so many of the things we do during advent are things that, if I were searching for a picture of them, I’d search under Christmas. (I also get more specific in that folder- Christmas Day gets its own sub-folder as do events we attend every year- Zoolights, Christmas Pageant, annual Christmas Card family photo session) The great thing about this being a digital project is that it is easy to edit as you go. When creating your bare bones folders, try to use the Goldilocks approach- you don’t want too many or too few. For me it is hard not to get too crazy specific, but if you do that you may as well just keep all the photos in one big file because you are going to get sick of going through too many sub-folders when you are trying to find something. If a folder starts hitting more than 100-150 photos in it, I usually start wondering if a sub-folder would be helpful. Again, I tweak things as I go, but knowing I have 10 main areas where I am going to sort photos REALLY helps me get in a flow state when it comes time to sort. Please don’t skip this step, even if your organization mode looks totally different than mine. Can you imagine how exhausting it would be to put clothes away if you were having to decide on drawers for each individual item instead of knowing ok, this is where all my shirts go, this is where all my socks go, etc?! Create this same baseline for your photos before you get down to the business of sorting.

These are two pictures of the same day, same sunset. One is just more zoomed in than the other and a different brightness. I don’t need both of them, but I do have a whole folder called “look up” because one day I want to do create poster filled with Arizona skies to hang in our home. This is another example of begin with the end in mind. If I didn’t have this project, I would probably strive to only keep 5-6 sunset pictures a year. Think about WHY you are keeping the photos you keep- for your kids to find? for a project? To accompany your best selling memoir in the future? This will effect how you organize your photos.
Now comes the hardest part for me- before you sort your photos into those beautifully organized folders… you have to edit out the pictures that aren’t what you want to keep. Maybe this step is really easy for you and you can look at the 20 pictures you took of a sunset and say- they are all pretty similar, I pick this one to keep for my memories… or I don’t even need a picture of a sunset for my memories… or maybe you are a normal human being and only took one picture of said sunset in the first place. This is not me. (#recoveringperfectionist) so part of why I set aside a good chunk of time each month to sort photos is I want to look at photos, compare and contrast, and decide which goofy grin of my kids is staying, which sweaty selfie is the one I want to remember my first ten mile run, etc. I try edit and delete as I go by day or by event and at the end of each “batch” (ie that day or that event) I don’t have limits on myself of how many photos I get to keep, but I do try to keep in mind my end goal of wanting to only keep enough that I won’t hate trying to find pictures later. This is often when I drag my husband or even my kids into the process. If I have two adorable pictures of my daughter eating pancakes or my son making those pancakes and they are practically the same but they are making two different but equally cute facial expressions, I let someone else pick their favorite and just trust their judgement on it because I think both are too cute to part with and I really don’t need 100 pictures of pancake breakfasts by the end of the year. I do indulge a bit more for our special occasion photos- I want pictures of my family members both being sung to and blowing out candles on their birthday cakes. I want more than just one picture of the beautiful Christmas morning mess post-presents. And don’t even talk to me about how many photos I kept from the weddings I attended last summer… but however many there are you can rest assured I had about twice as many to start with before I edited out whether I wanted the high def or brightened version of each picture, or which group photos had someone blinking, etc. Once I get through this challenge of editing, I then select all the photos I just edited for that batch and put them in their appropriate folder or folders.
After that, keep going! If you have a LOT of catching up to do… breaking it down into milestones and smaller goals helps a lot. When I was first putting photos in order I had thousands upon thousands of photos to sort and I got through it by setting mini goals for each day or week. Then I’d decide to swap out a Netflix show for a podcast as I sorted through them each night and little by little I caught up!
And just to give you a better example of how this is organized- here is a screenshot of my general folders for 2019 and an example of what subfolders look like in one of those categories:
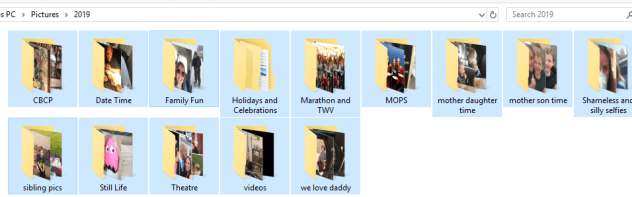
This is what it looks like when you click on “date time”- you’ll notice some dates I only took 1-2 pictures so they didn’t get their own photo folder. Again, my goal is to break things down just enough so I can easily find the picture or event I want in the future.

NEXT LEVEL: I don’t go through and name my pictures. I am hoping one day moving forward my photo process will be so smooth and I will get so good at editing out photos I don’t need that I’ll have more time to name my pictures or maybe tag who is in them to make them even more easily searchable, particularly to people outside my immediate family who might not be familiar with my digital filing system.
One last thing: If you are using a site that stores photos at a very low resolution as your only photo back up I beg you not to. Don’t give social media sites sole control of your memories. When you re-download those images and want to print them they become grainy and sad. Plus, there have been plenty of sad stories about people who randomly had their facebook or instagram accounts shut down.
OK, that was a LOT of information… I’m hoping I was fairly clear, but I haven’t written a post like this in a long time so PLEASE let me know if that was helpful and if you have any questions!

I’ve had this saved to come back to for so long and finally read it thoroughly – thank you! I have 32 THOUSAND pictures on my iphone and have my work cut out for me but seeing how someone else does it helps!
LikeLike
Hooray! I’m so glad it was helpful 🙂 I think I’d have that many pictures to if I had the storage on my phone! Maybe it’s a good thing Dan hasn’t agreed to upgrade yet… lol
LikeLike